Imagine a snowy morning in Winnipeg. You’re trying to get a client to an appointment. The wind is cold, and you feel nervous about operating the new equipment. You want everything to go smoothly because you care about the people you help. Statistics Canada reports that 27% of Canadians have a disability. They rely on you for safe transport. If you struggle with the equipment, it causes stress for everyone. Mastering your van wheelchair lift solves this gap. It turns a stressful process into a safe and dignified experience.
Au MoveMobility, we have spent over 20 ans helping organizations like yours remove barriers to healthcare and transportation. We’ve manufactured more than 150 mobile medical units across Canada. We hold Ford QVM and Stellantis QPro certifications, and our vehicles also carry the Marque nationale de sécurité.
You might have a new vehicle or be interested in one and want to know exactly how to operate the wheelchair lift on the van. We’ll guide you through the steps so you feel confident.
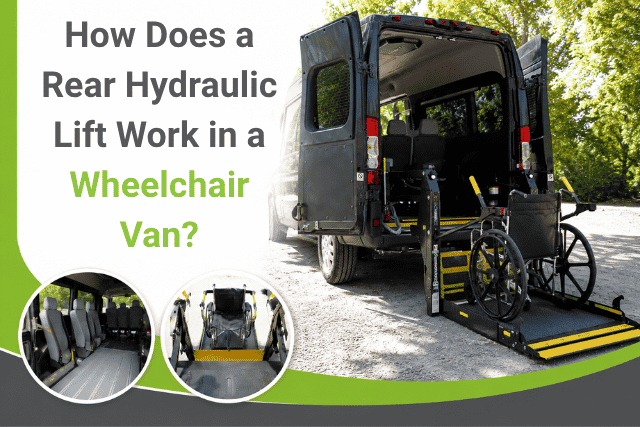
What are the four steps to operate the rear hydraulic lift in a wheelchair van?
Operating the rear hydraulic lift in your wheelchair van is as simple as following four easy steps.
Step 1: Engaging the interlock system for your rear hydraulic lift in a wheelchair van
The first step in safely operating your rear hydraulic lift in a fourgon pour fauteuils roulants is making sure the vehicle is completely prepared. Your vehicle is equipped with an interlock intermotive system. This system is a powerful safety feature.
It will not let the lift move until every necessary safety condition is met. This protection is put in place primarily for the safety of your passengers.
To operate the lift, you need to complete three simple checks inside the vehicle:
- Vehicle power: The vehicle needs to be turned on. The hydraulic system requires constant electrical power to work properly.
- In park: The vehicle must be secured in park. This prevents any forward or backward movement while the lift is in use.
- Park brake: The park brake must be on and completely engaged.
These three things, power, park, and brake, are essential steps you must complete. Once these conditions are met, you will see all the required lights lit up on the dashboard. When you see those indicator lights, the interlock system confirms that your van with a wheelchair lift is stationary and stable.
At this point, the hydraulic lift is good to operate.
But the system needs one more command. You must go to the back of the van wheelchair lift itself. There you will find the main switch for the ascenseur. You must make sure this switch on the lift is in the On position. Once the vehicle’s interior controls are set and the switch is on, you are fully ready to use your lift.
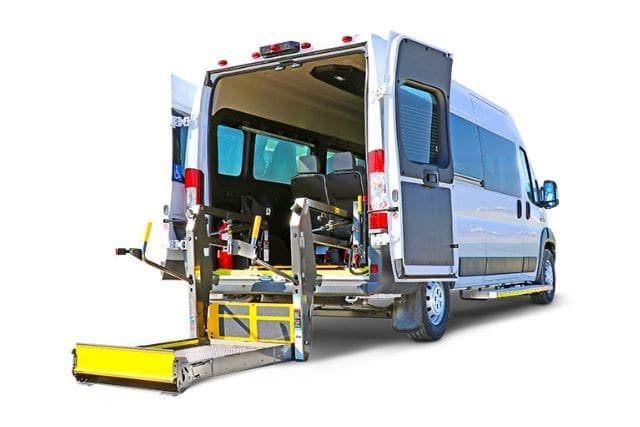
Step 2: Unfolding and lowering the wheelchair lift platform
With the system powered up, you’re ready to deploy the platform using the control box. This handheld box is how you manually command the hydraulic system. You’ll find that there are two buttons on your control box for basic movement. These buttons control the movement of the platform itself.
The first step is unfolding the platform:
- Unfold button: You press and hold this button to begin the platform’s movement.
- Motion: The platform moves from its vertical storage position to a flat, horizontal level.
- Level check: You must keep the button pressed until the platform reaches this fully level position. This ensures the lift surface is ready for the next action.
Once the platform has reached its level position, you must change your command. You can now go and switch to the Down function. Pressing the Down button tells the hydraulic system to slowly lower the platform toward the ground. The platform moves using controlled, steady pressure. You continue to press the Down button until your lift is safely on the ground.
The moment the lift is safely on the ground, you must make the final exterior check. Before you load any passenger, you must address the transition plate.
You want to go ahead and make sure that your latch is all the way down. The latch must be fully extended to ensure you can safely load the wheelchair onto the wheelchair platform lift. This final step creates a smooth, zero-step transition for the passenger.
Step 3: Loading the passenger and engaging the lift electronics
The lift platform is down, and the latch is secured all the way to the ground. You can now proceed to the most important part: loading your client. You will go ahead and load the wheelchair onto the lift. The chair must be positioned correctly and centrally on the platform surface.
Once the wheelchair is successfully loaded onto the platform, you must address passenger security. The lift is equipped with an essential safety belt. This belt is there to secure the individual to the platform during the ascent. You must fasten this belt.
Here is what you need to know about the safety belt:
- Function: It works just like a regular seat belt you find in a car.
- Purpose: Its purpose is to hold the passenger firmly in place while the van wheelchair lift is moving.
- Dignity: This is a critical step for dignity and security. Never lift a passenger until the safety belt is properly secured.
With the passenger secured, you can now return to the control box. You will go ahead and press the Up button on your lift.
- Engagement: This action will engage the electronics to work and begin the hydraulic ascent.
- Motion: The lift will smoothly and steadily raise the platform toward the level of the van floor.
- Supervision: You maintain a constant watch on the passenger and the mechanism throughout the lifting process.
Step 4: Folding the rear hydraulic lift in a wheelchair van for transport
Your passenger is safely inside the vehicle and secured. The next step is securing the rear hydraulic lift for the trip ahead. You must fold the lift back up into its original position. This step is mandatory for safe transport.
You’ll now return to your control box. While the passenger is safely secured inside, you use the controls to command the lift to fold. This process often involves pressing the Up button until the lift platform reaches the level of the van floor and then continues to move. The hydraulics automatically guide the platform to swing back up vertically.
The original position means the platform is vertical and securely locked inside the rear of the van. This is the same neat position it was in when you first started the process.
Why is folding so important?
- Safe Transport: An unfolded lift is a serious traffic hazard. You must secure the élévateur pour fauteuil roulant before the wheels turn even one rotation.
- Protection: Stowing the lift protects the sophisticated machinery itself from road debris or accidental damage during the drive.
- Vision: It clears your rear window. This gives the driver full visibility, which is essential for safe operation on the road.
The lift will continue to operate until it is fully stowed and locked into place. This mechanical action seals the rear door opening. This helps maintain the climate control inside the van. That is a welcome relief, whether you’re driving across the prairies or waiting for a ferry in British Columbia.
Checking that the van wheelchair lift is securely stowed is the final action that shifts your focus. You are now ready to transport your passenger smoothly and securely to their destination.
Want to know more about wheelchair lifts?
You probably came to this article feeling worried about using your new wheelchair van lift. Making a mistake while helping a passenger is a real concern. That stress can stop you from giving the best care possible.
You now clearly understand how the rear hydraulic lift in a wheelchair van works. You know the exact steps, from setting the safety lock to folding the platform for travel.
Au MoveMobility, we’re established leaders who focus on making safe travel easy and more dignified for everyone across Canada. Our leadership comes from wanting to help the people who help others. If you have any remaining questions about using your equipment, click the button below to talk to a mobility expert.
If you aren’t ready to talk to a mobility expert right now, we have a few other articles you should check out to learn more.
- Ramps vs. lifts: Which is right for your full size wheelchair van? This article helps you decide if a lift or a ramp is the best long-term option for your specific daily needs.
- How to choose a wheelchair van (11 steps): This resource is a simple guide to the entire buying process, helping you find the right vehicle for your organization.