Starting a handi-transit program often begins with a hard truth. According to Statistics Canada, nearly 1 in 5 Canadians lives with a disability. Yet many still struggle to get to medical appointments, work, or community programs. If you’re responsible for transportation in your organization, you likely feel that pressure. You see missed appointments, frustrated families, and people losing independence.
That gap between what people need and what your current service can handle is real. Without action, it grows. With the right handi-transit solution, that same gap becomes an opportunity to create access, dignity, and connection through something as practical as a full size wheelchair van built for real-world use.
At MoveMobility, we’ve spent over two decades helping organizations like yours close that gap. We’ve built more than 480 wheelchair vans in the past three years alone. We’re proud to hold Ford Pro Upfitter and Stellantis QPro certifications, along with the National Safety Mark. We’ve partnered with groups like Yellowknife Women’s Society and were honoured with the 2026 DARE Innovation Award. We’re one of many providers in this space, and our goal here is to give you clear, practical guidance you can trust.
In this guide, you’ll learn how to start a handi-transit program in Canada, step by step, including:
- What planning actually involves
- What you can expect to pay for a wheelchair accessible vehicle
- Annual maintenance costs
- How to launch and grow with confidence
What are the 10 steps to starting a handi-transit program?
Starting a handi-transit program can feel overwhelming at first. There are a lot of moving parts, and it’s easy to wonder where to even begin. The good news is that every strong program follows a clear path. Once you understand the steps, things start to feel a lot more manageable.
Let’s walk through this from the ground up, starting with the very first step most organizations overlook.
Step 1: Define the real transportation gap in your community
Before you look at commercial wheelchair vans or search for full size wheelchair vans for sale, you need to get clear on one thing. What problem are you actually solving?
This sounds simple, but it’s where many programs go off track.
Think about your community. Who is struggling to get where they need to go?
- Are seniors missing medical appointments?
- Are people in rural areas unable to access care?
- Are individuals with mobility challenges relying on costly private transport?
- Are families stepping in because there’s no reliable service?
For example, a small town in Northern Ontario might notice patients travelling hours for dialysis. In Vancouver, a community organization may see long wait times for accessible rides. Different regions, same gap. People need reliable, dignified transportation.
Here’s where you want to dig a little deeper:
- Volume: How many people need this service weekly?
- Distance: How far are typical trips?
- Mobility needs: Are you supporting wheelchairs, walkers, scooters, or stretchers?
- Timing: Are rides needed daily, or just for appointments?
This step gives you direction. It helps you avoid overbuilding or underbuilding your program.
You might think you need a fleet right away. In reality, many organizations start with one full size wheelchair accessible van and grow from there. Others may need multiple full size vans with wheelchair lifts from day one. The right answer depends on the gap you’re solving.
Quick tip: Talk directly to the people you plan to serve. A short survey or a few phone calls can give you better insight than weeks of guessing.
Once you’ve clearly defined the gap, everything else becomes easier. Your vehicle choice, budget, and service model all start to align.
And that leads naturally into the next step, where you’ll turn that gap into a clear and workable plan.
Step 2: Research demand and confirm your handi-transit program is truly needed
Now that you’ve identified a general gap, step 2 is about validating it with real data. This is where your handi-transit idea shifts from a good intention to something grounded and defensible.
You’re not planning routes yet, nor choosing vehicles yet. You’re simply answering one question:
Is there enough consistent demand to support starting a handi-transit program?
Move from assumptions to real insight
It’s easy to assume there’s a need. You’ve seen missed appointments or heard concerns from families. That’s a strong starting point, but you’ll want to back that up with real information.
Here’s how to do that in a practical way:
- Talk to local organizations: Clinics, senior centres, and community groups often know exactly who is struggling to get around.
- Connect with healthcare providers: Ask how often patients miss appointments due to transportation issues.
- Speak with families and caregivers: They’ll tell you where the current system falls short.
- Check municipal or provincial data: Many regions publish accessibility or transportation reports.
For example, a community group in Nova Scotia might learn that dialysis patients are missing two to three appointments per month due to lack of transportation. That’s a clear signal. In a place like rural Saskatchewan, you may find that travel distance is the biggest barrier, not availability.
Quantify the need in simple terms
You don’t need a complex study. Keep it simple and actionable.
Focus on a few key numbers:
- How many people need rides each week?
- How often do they need transportation?
- What types of mobility needs exist?
- What are the most common destinations?
Even rough estimates can go a long way.
Let’s say you discover:
- 25 people need weekly medical transport
- Each person needs 1 to 2 trips per week
- 40% use wheelchairs
That already gives you a clearer picture than guessing.
Understand what’s already in place
Before you move forward with starting a handi-transit program, take a close look at existing services.
Ask:
- Is there a local transit system offering accessible rides?
- Are wait times too long?
- Are service areas limited?
- Are costs too high for users?
This step helps you avoid duplication and instead position your program to fill the real gaps.
Quick example: In a city like Toronto, services exist but may have long booking delays. In Northern communities, there may be no accessible option at all. Your approach will look very different in each case.
Identify the risks of not validating demand
Skipping this step can create problems later.
You might:
- Invest in a commercial wheelchair van that sits idle
- Build a service that doesn’t match actual needs
- Struggle to justify funding or expansion
On the other hand, strong demand data makes everything easier. It supports funding applications, builds trust with partners, and gives your team clarity moving forward.
Keep your findings simple and clear
At the end of this step, you should be able to explain your findings in a few sentences:
- Who needs the service
- How often they need it
- What barriers they’re facing today
That’s it. No complicated reports needed.
Once you have that clarity, you’re in a strong position to move forward with confidence instead of guesswork.
And from here, the next step is to turn that validated demand into clear goals and outcomes for your handi-transit program so you know exactly what success looks like.
Step 3: Set clear goals and define what success looks like for your handi-transit program
With real demand confirmed, your next move is to get clear on what you’re trying to achieve. This step shapes your entire handi-transit program moving forward.
Think of it this way. If step 1 identified the gap and step 2 proved it exists, step 3 answers this:
What does a successful handi-transit program actually look like in your community?
Without clear goals, it’s easy to drift. You might run a service, but not know if it’s truly working.
Start with a simple purpose statement
Begin by putting your mission into one or two clear sentences.
Keep it grounded in the people you serve.
Example:
- “Provide reliable medical transportation for seniors in our region.”
- “Help individuals with mobility challenges attend appointments and community programs.”
This becomes your anchor. It keeps your program focused when decisions get tough.
Turn your purpose into measurable goals
Now take that purpose and make it measurable. You don’t need complex metrics. Just a few clear targets.
Here are some practical ones to consider:
- Number of rides per week
- Reduction in missed appointments
- Average wait time for bookings
- Service coverage area
- User satisfaction
Example scenario: A community health organization in Alberta might set a goal to provide 40 rides per week within the first six months, with an average wait time under 48 hours.
That’s clear. It’s realistic. And it’s easy to track.
Define who you’re prioritizing first
You can’t serve everyone at once. That’s okay.
This step is about choosing your starting point.
Ask yourself:
- Who has the most urgent need?
- Who is currently underserved?
- Where will your service have the biggest impact right away?
For some, that may be seniors needing medical transport. For others, it could be individuals in remote communities with no access to care.
Quick example: A First Nations community in Northern Manitoba may prioritize patients travelling long distances for specialist care. A city-based nonprofit in Ottawa may focus on daily transportation for individuals attending adult day programs.
Choosing a focus helps you build a program that works well before expanding.
Decide what “good service” means
This is where you define the experience you want people to have.
Think beyond transportation.
Ask:
- Should rides be door-to-door?
- Will drivers assist passengers in and out of the vehicle?
- How flexible should scheduling be?
- What level of dignity and comfort are you aiming to provide?
These decisions shape how your service feels to the people using it.
A well-run handi-transit program isn’t just about getting from point A to point B. It’s about making people feel safe, respected, and supported along the way.
Align your goals with your future vehicle needs
While you’re not choosing vehicles yet, your goals should hint at what you’ll need later.
For example:
- If your goal includes transporting multiple wheelchair users per trip, you’ll likely need full size wheelchair accessible vans with flexible seating.
- If your focus is longer regional trips, durability and comfort will play a bigger role in your commercial wheelchair vans selection.
- If you plan to scale quickly, you may eventually explore multiple full size vans with wheelchair lifts instead of a single unit.
This keeps your planning grounded in reality without jumping ahead.
Keep your goals realistic and flexible
It’s tempting to aim big right away. Serve everyone. Cover every route. Run seven days a week.
That approach can stretch your resources too thin.
Start with goals you can confidently achieve, then grow.
Simple rule:
- Start focused
- Track progress
- Adjust as needed
Programs that grow steadily tend to last longer and serve people better over time.
Write it down and share it with your team
Before moving on, document your goals clearly.
You should be able to answer:
- What are we trying to achieve?
- Who are we serving first?
- How will we measure success?
Share this with your team, leadership, or partners. Alignment early on prevents confusion later.
At this stage, you’ve defined the need and clarified what success looks like. You’re building a strong foundation that keeps your program focused and intentional.
Next, you’ll take those goals and start mapping out the service model that brings your handi-transit program to life in a practical, day-to-day way.
Step 4: Create a simple business plan for your handi-transit program
You’re now at the point where creating a business plan makes sense. At this stage, your handi-transit program needs structure. You’ve defined the need and set your goals. Now you’re putting it all into a clear, organized plan that others can understand and support.
Don’t worry, this isn’t about writing a long, complicated document. Think of it as a practical roadmap that answers one key question:
How will this handi-transit program actually operate and sustain itself?
Why is a business plan so important at this stage?
A solid plan helps you move forward with confidence.
It also helps when you:
- Apply for funding or grants
- Present to leadership or a board
- Partner with healthcare or community organizations
- Compare options like commercial wheelchair vans for sale or leasing
Without a plan, decisions can feel scattered. With one, everything starts to line up.
Keep your business plan simple and focused
You don’t need 30 pages. Most successful programs start with something clear and easy to follow.
Here’s what to include:
1. Program overview
What you’re doing and why:
- What your handi-transit program is solving
- Who you’re serving
- What your service looks like at a high level
2. Service outline
How your program will run:
- Days and hours of operation
- Types of trips offered
- Basic booking approach
Keep this aligned with the goals you set in the previous step.
Build out your financial picture
This is often the part people avoid. It doesn’t need to be perfect, just realistic.
Break it into two parts:
Startup costs
- Vehicle purchase or lease
- Initial setup costs
At this point, you might start researching options like:
- Full size wheelchair vans for sale
- Commercial wheelchair accessible vans
You’re not making a final decision yet. You’re estimating what your investment could look like.
Ongoing costs
- Driver wages
- Fuel
- Insurance
- Administration or scheduling tools
A simple monthly estimate is enough to start.
Identify how your program will be funded
Now ask a practical question:
Where is the money coming from?
For example, a nonprofit in Ontario might combine grant funding with small rider fees. A municipality in Alberta may fully fund the service through its transit budget.
You don’t need every dollar confirmed yet. You just need a clear direction.
Outline your team and responsibilities
Even a small program needs clear roles.
Think about:
- Who manages bookings?
- Who drives the vehicle?
- Who handles scheduling or coordination?
In the beginning, one person may wear multiple hats. That’s normal.
As your program grows, these roles can expand.
Keep it flexible and easy to update
Your first business plan isn’t your final one.
It’s a working document that will evolve as your handi-transit program grows.
Quick tip: Write it in a way that’s easy to adjust. A simple document or shared file works well.
A quick example to bring this together
Let’s say a community organization in Saskatchewan is planning to launch hand-transit service.
Their simple plan might look like this:
- Goal: Provide 30 rides per week for medical appointments.
- Vehicle plan: Start with one full size wheelchair accessible van.
- Funding: Combination of provincial grant and local fundraising.
- Operations: Weekday service, phone-based booking.
- Team: One driver and one part-time coordinator.
It’s not complicated. But it’s clear. And that clarity helps everything else move forward.
At this point, you’ve taken your idea and turned it into a structured plan that others can understand and support.
Next, you’ll look at the rules and regulations across Canada so your handi-transit program is set up safely and legally from the start.
Step 5: Secure funding that fits your handi-transit program plan
Now you’ve reached a point where things get real. Your handi-transit program has a clear need, defined goals, and a structured plan. The next step is making sure you have the funding to support it.
This is where many organizations pause. You might be asking yourself:
“What does this actually cost, and how much funding do we need?”
Let’s break that down in a simple, practical way.
Start with a realistic budget range
If you’re new to this space, vehicle pricing can feel like a guessing game.
For a typical full size wheelchair accessible van, a realistic budget in Canada looks like this:
- $145,000 to $259,000 for a wheelchair accessible van
- Larger vehicles like buses can go significantly higher
That range depends on factors like seating layout, lift systems, and customization. A full size van with wheelchair lift for sale will vary based on how it’s built to support your passengers.
Click the button below to check out our full pricing guide.
Look beyond the purchase price
The vehicle is a big piece, but it’s not the whole picture.
You also need to budget for ongoing costs that keep your handi-transit program running smoothly.
Here’s what to expect annually:
- Maintenance: Around $6,480 to $7,290 per year.
- You can explore a full breakdown in this wheelchair van cost guide
- Fuel: Typically $3,500 to $4,000 per year.
- See more details in this fuel cost article
These numbers help you avoid surprises later. They also give you a clearer funding target when you’re speaking with partners or applying for grants.
Match funding to your actual plan
At this point, your funding goal should connect directly to your business plan.
Think of it in three parts:
1. Startup funding
This covers getting your program off the ground.
- Vehicle purchase
- Initial setup costs
- Basic equipment
2. Operating funding
This supports your service over time.
- Maintenance and fuel
- Staffing costs
- Day-to-day operations
3. Growth funding
This allows you to expand when demand increases.
- Additional full size wheelchair vans
- Service area expansion
- Increased trip capacity
Not every program secures all three at once. Many start with startup funding, then build toward stable operations.
Explore common funding sources in Canada
There’s no single path to funding. Most successful programs use a mix.
Here are a few common options:
- Government grants: Federal, provincial, and municipal programs often support accessible transportation.
- Healthcare partnerships: Hospitals or clinics may contribute if your service reduces missed appointments.
- Community fundraising: Local donors and events can play a big role.
- User fees: Some programs charge small ride fees to support operations.
Example: A nonprofit in British Columbia might secure a provincial accessibility grant to purchase a full size wheelchair accessible van, then partner with a local health centre to help cover operating costs.
Don’t forget to check out our article on how to apply for wheelchair van grants and the top five things that make a successful grant application to streamline this step.
Build confidence when presenting your funding request
When you approach funders, clarity is everything.
You should be able to explain:
- Who you’re helping
- How many people will benefit
- What the total cost looks like
- What impact your handi-transit program will have
Funders aren’t just investing in a vehicle. They’re investing in outcomes like improved access to care, reduced isolation, and stronger communities.
Keep your funding approach flexible
You don’t need every dollar secured before moving forward.
Some organizations:
- Start with one commercial wheelchair van
- Launch a limited service
- Expand as funding grows
Others secure full funding upfront and launch at a larger scale.
Both approaches work. It depends on your comfort level and your community’s needs.
At this stage, you’ve built a clear financial picture and understand what it takes to bring your handi-transit program to life.
Next, you’ll look at the regulations and compliance requirements across Canada, so your program operates safely, legally, and with confidence from day one.
Step 6: Understand handi-transit regulations and compliance requirements in Canada
This is the step where you slow down and check the rules before your handi-transit program moves any closer to launch. It may not be the most exciting part. No one starts a program because they love paperwork. But this step protects your riders, your team, and your organization.
Regulations can vary by province, vehicle type, passenger capacity, service model, and funding source. Do your own due diligence with provincial transportation authorities, your insurer, legal counsel, and your vehicle provider before launching.
The main goal here is simple: Make sure your handi-transit service is safe, legal, and built around dignity for people with disabilities.
Start with federal accessibility rules
In Canada, the Accessible Transportation for Persons with Disabilities Regulations apply to federally regulated transportation providers. These rules cover areas like communication, training, services, fleets, equipment, terminals, and security screening. The Canadian Transportation Agency also states that these regulations are meant to support accessible transportation for people with disabilities.
For many local handi-transit programs, your service may fall under provincial or municipal rules instead of federal ones. Still, the federal framework gives you a strong idea of what good accessible transportation should include.
That means your program should be designed around:
- Dignity: Riders should feel respected from booking to drop-off.
- Safety: Staff must know how to support passengers and mobility aids.
- Clear communication: Riders need service details in a format they can use.
- Accessibility: Vehicles and processes should reduce barriers, not add new ones.
This is where your program moves from “we have a vehicle” to “we have a service people can trust.”
Check your provincial transportation rules
Next, look at the province where your handi-transit program will operate. This is important because local rules can change how you license, insure, and operate your service.
For example, in British Columbia, a licence for commercial passenger vehicle operators is a bit different than other provinces, especially if you’re providing ride-sharing services.
In Manitoba, the Accessible Transportation Standard includes requirements related to policies, equipment, vehicle design, fares, hours of service, and routes. That’s directly relevant if you’re planning a public or community transportation service.
In Ontario, transportation accessibility is part of the Integrated Accessibility Standards Regulation under the AODA. It covers transportation as one of the main accessibility standards.
The takeaway is simple. Don’t assume the rules in Alberta, Ontario, B.C., or Manitoba are the same. They may share the same goal, but the forms, licences, and operating requirements can differ.
Confirm vehicle compliance before you buy
Your vehicle also needs to meet Canadian safety requirements.
Transport Canada states that vehicles made for sale in Canada and vehicles imported into Canada must meet the Canada Motor Vehicle Safety Standards.
For a full size wheelchair accessible van, this is a big deal. Accessibility modifications can affect flooring, seating, wheelchair securement, lifts, ramps, electrical systems, and weight ratings.
That’s why many organizations look for a full size van wheelchair accessible model from a qualified Canadian manufacturer. It helps confirm that the vehicle was built with Canadian safety requirements in mind.
When reviewing commercial wheelchair vans, ask about:
- National Safety Mark: Does the modified vehicle meet Canadian safety standards?
- Weight ratings: Can the vehicle safely carry passengers, wheelchairs, equipment, and staff?
- Securement systems: Are wheelchair restraints properly installed?
- Lift or ramp compliance: Is the equipment rated for your use case?
- Documentation: Can the provider give you the paperwork needed for registration and insurance?
A low-cost full size wheelchair van for sale by owner may look tempting. But if documentation is missing, the savings can disappear faster than snacks in a staff room.
Review driver, insurance, and operating requirements
This part depends heavily on your province and service model.
You may need to confirm:
- Driver licence class: Passenger capacity can affect licence requirements.
- Commercial insurance: Your insurer may need details on passengers, use, routes, and accessibility equipment.
- Inspection schedules: Some vehicles may need commercial vehicle inspections.
- Driver training: Staff may need training in passenger assistance, lift use, securement, emergency procedures, and disability awareness.
- Incident reporting: Your organization should know how to document safety events.
If your handi-transit program is run by a municipality, nonprofit, First Nations community, healthcare group, or private operator, requirements may differ. This is why early conversations with provincial regulators and insurance providers are worth the time.
Keep compliance focused on rider trust
Rules are important, but they’re not the heart of the program. People are.
Compliance should help your riders feel:
- Safe getting into the vehicle
- Comfortable during the trip
- Respected by trained staff
- Confident they can book again
That’s the real value of doing this step well.
At this point, you’ve checked the rules that shape how your handi-transit program can operate in Canada. Next, you can start choosing the right wheelchair accessible vehicle for the service you’re building.
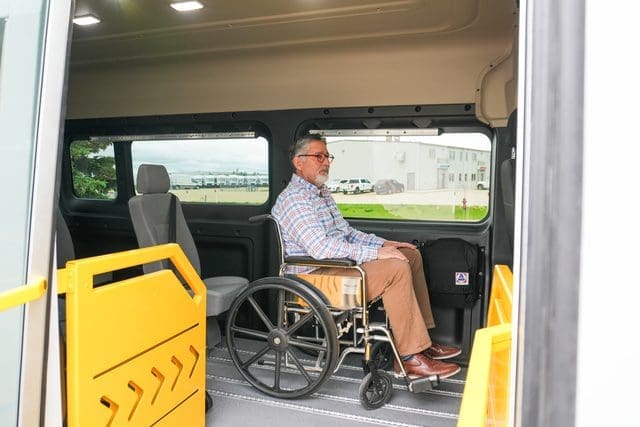
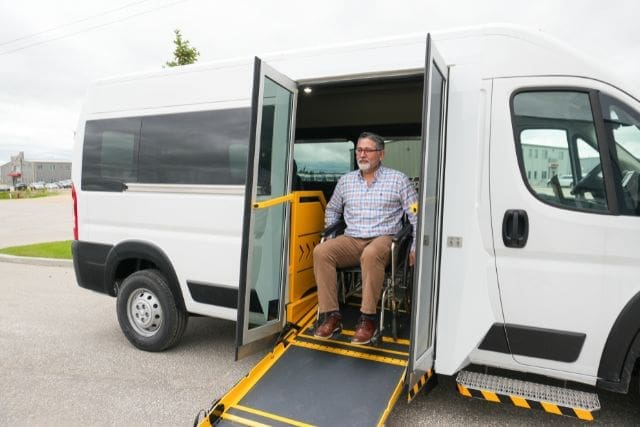
Step 7: Choose the right wheelchair accessible vehicle for your handi-transit program
After you’ve secured funding, reviewed the rules, and built a clear plan, you finally reach the part many teams get excited about: choosing the right vehicle for your handi-transit program.
This is where the program starts to feel real. You can picture the first pickup and can imagine someone getting to an appointment without stress. You can picture a family member finally saying, “Good, they have a safe ride.”
The right vehicle should fit your riders, your routes, and your daily service. A shiny van is nice. A van that works for your people every day is better.
Start with who will ride in the vehicle
Before diving in and comparing full size wheelchair vans for sale, think about your passengers.
Ask yourself:
- Wheelchair users: How many will ride at one time?
- Ambulatory riders: Will some passengers walk on with canes or walkers?
- Caregivers: Will support workers or family members ride along?
- Trip length: Will riders be in the van for 10 minutes or two hours?
A full size wheelchair accessible van can be set up in different ways. Some layouts prioritize wheelchair positions. Others create more room for mixed seating. The best choice depends on what your riders need most.
Think about lift, ramp, and entry style
For many handi-transit programs, the lift or ramp is one of the most important choices.
You’ll want to consider:
- Rear entry: Often useful for simple loading and unloading.
- Side entry: Helpful in curbside pickup areas.
- Lift system: Good for heavier mobility devices.
- Ramp system: May work well for certain routes and rider needs.
There’s no perfect setup for every community. A rural program in Manitoba may need something different than a city-based service in Mississauga. Snow, parking space, road conditions, and loading areas all play a role.
Choose a layout that can adapt
Your first layout may not be your forever layout.
Demand can change. Rider needs can change. Your program may grow. That’s why flexibility is worth thinking about early.
A full size wheelchair van with adjustable seating can help you serve different rider mixes without needing a new vehicle right away.
For example, one day you may transport two wheelchair users and one caregiver. The next day, you may need space for one wheelchair user and several ambulatory passengers.
That flexibility can make your commercial wheelchair van more useful over time.
Look at comfort, safety, and daily usability
People using handi-transit may already feel stressed before the ride begins. A good vehicle can make that experience feel calmer and more dignified.
Pay close attention to:
- Headroom: Riders and staff need space to move safely.
- Interior space: Wheelchairs should fit without feeling cramped.
- Securement systems: Riders need to feel stable and protected.
- Heating and cooling: Canadian weather likes to keep us humble.
- Lighting: Drivers and attendants need to see clearly during boarding.
A full size van wheelchair accessible setup should feel practical for staff and respectful for riders.
Consider Canadian roads and weather
This part gets real fast in Canada.
Your vehicle may face:
- Gravel roads in rural Saskatchewan
- Snow-packed streets in Northern Ontario
- Heavy rain in coastal B.C.
- Freeze-thaw conditions in Atlantic Canada
So don’t only think about the inside of the vehicle. Think about where it will drive.
Depending on your region, you may want to consider tires, heating systems, ground clearance, storage, and service access. A wheelchair full size van that works well in one region may need different options in another.
Compare new, used, and private-sale options carefully
As you’re searching, you may come across:
- Used full size wheelchair accessible vans for sale
- New Commercial wheelchair accessible vans
- Full size wheelchair vans for sale by owner
- Full size wheelchair conversion vans
Each option has pros and cons.
A used or private-sale vehicle may cost less upfront. But it may come with unknown wear, missing documentation, older equipment, or limited support. For a public-facing handi-transit service, those risks can become expensive.
A new or professionally converted vehicle often gives you more confidence around layout, warranty, safety documentation, and long-term support.
Choose based on fit, not just price
Price matters. Of course it does. But the lowest price may not be the lowest cost over time.
A better question is: Which vehicle will help us serve riders safely, reliably, and with dignity for years?
That question keeps the focus where it belongs: On the people using the service.
At this stage, you’re choosing the tool that brings your handi-transit program to life. Next, you’ll need to build the team, training, and daily processes that help that vehicle serve people well.
Step 8: Build your handi-transit operations, team, and day-to-day processes
You’ve got the plan, the funding, and the right vehicle lined up. Now comes the part that turns your handi-transit program into a reliable service people can count on every day.
This step is all about how your program actually runs.
A well-built operation means fewer missed rides, less stress for your team, and a better experience for every rider who depends on you.
Start with simple, clear booking and scheduling
If people can’t easily book a ride, the rest of your program won’t matter.
Keep your system simple to start.
You might begin with:
- Phone bookings: A dedicated number during set hours.
- Basic scheduling tools: Even a shared calendar can work early on.
- Clear booking windows: For example, 24 to 48 hours notice.
As your program grows, you can move into more advanced scheduling software. But early on, clarity beats complexity.
Example: A small program in rural Alberta may start with phone bookings handled by one coordinator. As demand grows, they introduce a digital system to manage multiple daily routes.
Define your daily service flow
Next, map out what a typical day looks like.
Walk through it step by step:
1. Bookings come in
2. Trips are scheduled and grouped
3. Driver receives route plan
4. Pickups and drop-offs happen
5. Any issues are recorded and addressed
This helps you spot gaps before they happen.
A strong handi-transit operation feels smooth to the rider. Behind the scenes, it’s built on clear routines.
Hire and prepare the right team
Your vehicle gets people where they need to go. Your team shapes how that journey feels.
Look for people who are:
- Patient and respectful
- Comfortable working with diverse mobility needs
- Calm under pressure
- Strong communicators
Even if you’re starting small, your first driver sets the tone for your entire service.
Train your team for real-world situations
Training doesn’t need to be complicated, but it does need to be practical.
Focus on:
- Wheelchair securement and safety procedures
- Passenger assistance techniques
- Emergency response basics
- Communication with riders and caregivers
If you’re using full size vans with wheelchair lifts, hands-on practice is key. Confidence comes from doing, not just reading.
Quick example: A new driver in Ontario might practice loading and securing different types of wheelchairs before their first shift. That way, the first real pickup feels routine, not stressful.
Set clear service expectations
Your riders need to know what to expect.
Define and communicate:
- Pickup windows
- Cancellation policies
- Wait times
- Driver assistance level
This reduces confusion and builds trust.
For example, letting riders know there’s a 15-minute pickup window can prevent frustration if a driver is slightly delayed.
Track simple performance metrics
You don’t need complex dashboards.
Start with a few key indicators:
- Number of rides per day or week
- On-time pickups
- Missed or canceled trips
- Rider feedback
These numbers help you spot patterns early.
If missed trips increase, you’ll know something needs attention before it becomes a bigger issue.
Keep communication tight
Strong communication keeps your operation running smoothly.
Make sure:
- Drivers can quickly reach your coordinator
- Riders know how to contact your service
- Changes or delays are shared clearly
Even a quick phone call can make a big difference in how a rider experiences your service.
Plan for the unexpected
Things will go wrong at some point. Weather delays. Vehicle issues. Last-minute cancellations.
The goal isn’t to avoid every problem. It’s to handle them well.
Have simple plans for:
- Backup drivers or coverage
- Rescheduling missed trips
- Basic troubleshooting for your vehicle
A reliable commercial wheelchair van helps, but your response system is what riders remember.
Build around dignity and trust
At the heart of your handi-transit program are people who rely on you.
Every ride is more than transportation.
It’s:
- A medical appointment that can’t be missed
- A chance to stay connected to the community
- A step toward independence
Your operations should reflect that.
At this stage, your handi-transit program is no longer just an idea. It’s a working service with real people, real schedules, and real impact.
Next, you’ll focus on launching your service and getting your first riders on the road with confidence.
Step 9: Launch your handi-transit program carefully and confidently
Now your handi-transit program is ready to move from planning into action. This is the point where your first riders start using the service, your team tests the process, and your community begins to see the benefit.
The goal here isn’t to launch big. The goal is to launch well.
A careful launch helps you find issues early, fix them quickly, and build trust from day one.
Start with a soft launch
Before opening the service to everyone, begin with a smaller group of riders.
This could include:
- A few regular medical appointment riders
- A small group from a partner clinic
- Residents from one care home or community program
- A limited service area
A soft launch gives your team time to test real trips without feeling overwhelmed.
For example, a nonprofit in rural Nova Scotia might begin with three days per week for medical appointments only. A municipality in Manitoba may start with one neighbourhood before expanding across town.
This lets you learn before the pressure rises.
Test the full rider experience
During launch, look at the full journey from the rider’s point of view.
Ask yourself:
- Was booking easy?
- Did the rider know when to expect pickup?
- Was boarding safe and comfortable?
- Did the driver feel prepared?
- Did the trip arrive on time?
This is where small details show up. Do riders need clearer pickup instructions? Maybe caregivers need reminder calls? Maybe drivers need more time between trips?
That’s normal. Launch is where your handi-transit program gets sharpened.
Communicate clearly with your community
People need to understand what your service offers and how to use it.
Keep your launch message simple:
- Who the service is for
- Where it operates
- How to book a ride
- What types of trips are available
- Who to contact with questions
Avoid making it sound more complex than it is. People should be able to read your message once and know what to do next.
You can share this through:
- Your website
- Local clinics
- Seniors’ centres
- Community newsletters
- Social media
- Partner organizations
If your program serves a First Nations community, rural region, or newcomer population, make sure your message fits the people you serve. Plain language goes a long way.
Confirm compliance before public launch
Before you move beyond a soft launch, pause and confirm your requirements one more time.
This may include:
- Vehicle registration and insurance
- Driver licensing
- Inspection requirements
- Passenger transportation rules
- Accessibility policies
- Safety procedures
Remember that transportation rules can vary across Canada based on province, vehicle type, passenger capacity, and service model. It’s recommended to confirm your launch requirements with your provincial transportation authority, insurer, and internal advisors before offering public service.
This step is less about paperwork and more about trust. Riders and families are placing their safety in your hands. That deserves care.
Gather feedback from early riders
Your first riders will teach you a lot.
Ask simple questions after their trip:
- Was the ride comfortable?
- Did you feel safe?
- Was booking clear?
- What would make the service better?
You don’t need a long survey. A short phone call can work well.
This feedback helps you improve before expanding. It also shows riders that their voice matters.
Make small improvements before expanding
Once your first trips are complete, review what worked and what didn’t.
You may need to adjust:
- Pickup windows
- Booking instructions
- Trip spacing
- Rider communication
- Driver procedures
Small changes can make a big difference.
For example, adding a reminder call the day before a ride may reduce missed pickups. Adding five extra minutes between trips may help drivers support riders with less pressure.
That’s how a good service becomes a trusted one.
Launch with confidence, not perfection
No handi-transit program launches perfectly. Something will need tweaking. That doesn’t mean the program failed. It means real life showed up, as it tends to do.
The key is to start with care, listen closely, and improve quickly.
At this point, your program is no longer just a plan. Your full size wheelchair accessible van is helping people reach appointments, programs, and community spaces they may have missed before.
Next, you’ll measure performance and look for smart ways to grow your handi-transit program over time.
Step 10: Measure, improve, and keep your handi-transit program compliant
Once your handi-transit program is running, your work shifts from “How do we launch?” to “How do we keep improving?” This is where you track what’s working, fix what isn’t, and keep your service aligned with accessibility and transportation requirements.
Track the right handi-transit program numbers
Start with simple numbers your team can actually use. You don’t need a giant dashboard that makes everyone quietly close the laptop.
Use metrics that tell you if your service is reliable, safe, and useful.
| What to track | Why it helps | Example question |
| Ride volume | Shows demand over time | Are more people booking each month? |
| On-time pickups | Measures service reliability | Are riders waiting too long? |
| Missed or cancelled trips | Reveals service gaps | Are cancellations rising? |
| Rider feedback | Shows comfort and trust | Do riders feel safe and respected? |
| Vehicle downtime | Tracks service risk | Is your full size wheelchair van available when needed? |
| Training records | Supports compliance | Have drivers completed required training? |
| Incident reports | Improves safety | Are there repeat issues to fix? |
These numbers help you make better decisions without guessing.
Review accessibility practices on a set schedule
Your handi-transit program should include regular accessibility reviews. This can be monthly, quarterly, or tied to your board reporting cycle.
Look at practical items like:
- Communication: Can riders understand how to book, cancel, and ask for help?
- Training: Are drivers confident with securement, lifts, ramps, and passenger support?
- Policies: Are your service rules clear and easy to find?
- Vehicle use: Is your full size van wheelchair accessible setup still working for your riders?
- Complaints: Are people raising the same concern more than once?
This is where compliance and compassion meet. The rules give you structure. Rider feedback tells you how the service feels in real life.
Keep staff training current
Training shouldn’t be a one-time event during launch. People forget things. Equipment changes. New staff join. Winter shows up and humbles everybody.
Build refresher training into your yearly plan.
Focus on:
- Wheelchair securement
- Lift or ramp operation
- Emergency steps
- Disability awareness
- Respectful communication
- Safe passenger assistance
The Canadian Transportation Agency has guidance for training personnel who assist travellers with disabilities, including obligations for covered transportation providers under federal rules. That makes training a smart habit, even for local programs that may follow provincial requirements instead.
Use feedback to improve the rider experience
Your riders will often spot issues before your team does.
Ask simple questions:
- Was the ride comfortable?
- Was the pickup time clear?
- Did you feel respected?
- What would make the service easier?
Then act on what you hear.
Maybe riders need larger-print booking instructions. Maybe a caregiver needs clearer pickup windows, or maybe your commercial wheelchair van layout works well for one group but feels tight for another.
Small changes can create a big difference in dignity and trust.
Know when it’s time to grow
Growth should come from evidence, not pressure.
You may be ready to expand if:
- Riders are being turned away often
- Booking demand keeps rising
- Your current vehicle is near full use
- Vehicle downtime puts service at risk
- Partners are asking for more coverage
At that point, you may start to consider adding another commercial wheelchair accessible van. A second vehicle can expand access, but it should fit the same clear purpose that started your program.
Keep improving with people at the centre
A strong handi-transit program doesn’t stay frozen in place. It grows as your riders, community, and service needs change.
Measure what matters. Listen closely. Keep training sharp. Review your compliance steps. Then improve with care.
That’s how a full size wheelchair accessible van becomes a dependable connection to care, community, and independence.
Ready to start a handi-transit program?
You came here because something isn’t working. People in your community are missing rides, missing care, and missing connection. That gap has real impact, and you’ve been looking for a clear way to fix it with a handi-transit program that actually works.
After walking through this guide, you now understand how to move forward with confidence:
- Define the need, validate demand, and set clear goals
- Build a plan, secure funding, meet regulations, and choose the right vehicle
- Launch, operate, and improve your handi-transit program over time
At MoveMobility, we’ve worked alongside organizations across Canada who were in your exact position. Teams that started with uncertainty and turned it into a reliable service people depend on every day. What sets us apart is how we approach that journey with you. We focus on real-world use, long-term reliability, and building solutions that fit your community, not forcing you into something off the shelf.
You’re not just getting a vehicle. You’re building something that changes how people access care, connection, and independence. If you have questions or want to talk through your next step, click the button below to connect with a mobility expert.
What should you read next?
If you’re not ready to talk to a mobility expert yet, here are a few resources that can help you take the next step:
- Buying an accessible vehicle: Your Process with MoveMobility: Learn the complete buyer’s process you’ll experience with us.
- Is training included with my van purchase? Here’s what to expect: This article is helpful if you’re worried about how to use a wheelchair van after purchase.
- How to compare wheelchair van quotes and things to look for: Lastly, this one will help you compare quotes once you get to that step.
Frequently asked questions about starting a handi-transit program
Q: What is a handi-transit program?
A: It’s a transportation service designed for people with mobility challenges, often using a full size wheelchair accessible van to provide safe, reliable rides.
Q: How long does it take to start a handi-transit program?
A: Most programs take 2 to 6 months depending on planning, funding, and vehicle availability.
Q: How much does a handi-transit vehicle cost in Canada?
A: A full size wheelchair van typically ranges from $145,000 to $259,000, depending on features and layout.
Q: Do I need special licensing to operate a handi-transit service?
A: Requirements vary by province. You may need specific driver’s licenses based on passenger capacity or if you’re offering ride-sharing services.
Q: Can I start with just one vehicle?
A: Yes. Many organizations begin with one full size wheelchair van and expand as demand grows.
Q: What’s better for handi-transit, a van or a bus?
A: It depends on demand. Vans are often more flexible and cost-effective for smaller or growing programs.
Q: Where can I find funding for a handi-transit program?
A: Common sources include government grants, healthcare partnerships, and community fundraising.
Q: What features should I look for in a wheelchair accessible van?
A: Focus on layout, lift or ramp type, securement systems, and flexibility for different passenger needs.
Q: How do I know if my community needs this service?
A: Look at missed appointments, lack of accessible transit, and feedback from local organizations and families.